Godot Tech Tree
Tech trees are a common feature in games. They take different forms but the basic idea is an interface that allows the player to progress through a hierarchy of technologies they can obtain. In this article we will examine the basics of how to make a tech tree with Godot and GDScript. As a bonus we will also look at how to include a rudimentary zoom feature and allow the player rearrange the position of the nodes on the tech tree.
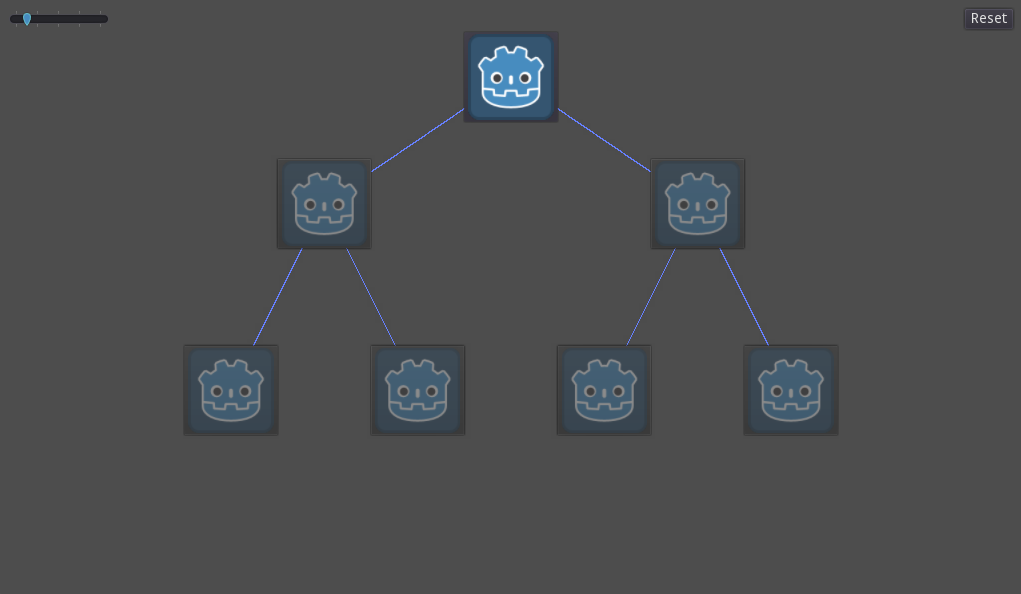
Before we start, let’s look at what a tree is. You have almost certainly seen a tree in the wild. It has branches and leafs. In this article leafs are called “nodes”. Branches are represented as lines between nodes (these are known as edges). When the edge of one node connects with another we will call that connection “neighbor” (See figure 1).
Note:
What I am describing is a computer science concept known as a “graph”. A graph is a set of nodes that has neighboring nodes. A tree is a special type of graph. You don’t need to know anything about computer science or graph theory to build a tech tree for your game, but it is worth being aware of the concept of graphs as they are very useful.
Figure 1
        A
      /   \
    B       C
  /   \   /   \
D      E F      G
Figure 1 is a typical tree. It looks like an org chart. A common use of a tree is representing a directory on a computer. Another example is a nested bullet list in a document. Refer to figure 2.
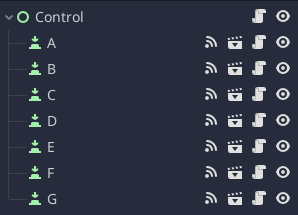
Figure 2
A
- B
  - D
  - E
- C
  - F
  - G
There are lots of trees in the wild. In games they frequently represent relationships between stages of progress. In this article we will examine how to create a basic tech tree with Godot similar to the tree in figure 1. As a bonus we will also make the tech tree interactive by allowing the player to move the nodes of the tree. By the end you should have an idea of how to get started creating your own tech tree. Check out the demo to see the final product. You can also view the complete source code on GitHub.
Tech Tree Node
Building the scene:
- Create a new scene and a
Buttoncontrol node (click+or “Other Node” in the scene menu). - Save the scene and name it Node.
- Set the button to “Toggle Mode” in the inspector menu.
- Attach a script to the scene and save it as
Node.gd.
The node scene.
If you like you can also include a button icon. This icon should probably represent what technology the player will unlock when they click the button. To keep things simple I am using the Godot logo that is included as the default icon in every new project.
Note:
If you want to use the icon as a button icon you will need to convert it to an
Imagein the import menu.
Node.gd:
extends Button

var neighbors = [] setget set_neighbors
var lines = []
var neighbor_lines = []
var delay = 10
First we need a place to store neighbors of a node. We will use an array for that. This variable will also have a setter called set_neighbors that we will use to trigger drawing lines between the node and its neighbors. The variables lines and neighbor_lines are used for updating the positions of the lines when the player moves a node on the screen.
func add_line(neighbor):
    var line = Line2D.new()
    line.width = 2
    line.z_index = -1
    line.add_point(rect_position + rect_size / 2)
    line.add_point(neighbor.rect_position + neighbor.rect_size / 2)
    lines.push_back(line)
    neighbor.neighbor_lines.push_back(line)
    get_parent().add_child(line)
The function add_line() iterates through all neighbors and draws a line between the node and its neighbors using Line2D. The z index of each line is set to -1 to ensure the line is drawn behind the node. When the point positions are added we calculate the center of the node using the formula rect_position + rect_size / 2. Next we store the line in lines and we tell the neighbor to store the line in neighbor_lines. If we don’t tell the neighbor to store the line position only line created by the Node will be updated when the player moves a node.
func update_lines():
    for line in lines:
        line.set_point_position(0, rect_position + rect_size / 2)
    for line in neighbor_lines:
        line.set_point_position(1, rect_position + rect_size / 2)
update_lines() updates the point position of the lines created by the node as well as lines that were created by neighboring nodes. When a node moves all the 0th point position lines need to be moved to the new position of the node and all 1st point position neighbor_lines need to be moved to the new position of the node, again using rect_postion + rect_size / 2 to calculate the center of the node.
func set_neighbors(new_neighbors):
    for neighbor in new_neighbors:
        if not neighbors.has(new_neighbors):
            add_line(neighbor)
    neighbors = new_neighbors
set_neighbors is the setter for neighbors. When neighbors are added it stores them and draws lines between the node and its neighbors. We only draw lines to a neighbor in new_neighbors if it doesn’t exist in neighbors. Otherwise, each time neighbors is updated additional lines will be drawn to the old neighbors.
func _on_Button_toggled(button_pressed):
    if pressed and button_pressed:
        for neighbor in neighbors:
            neighbor.disabled = false
When the button is pressed the next button is “unlocked” for the player by setting it disabled property to false. For the sake of simplicity, we won’t worry about doing anything else here. However, this is the place to invoke whatever happens when a particular thing is unlocked in your tech tree.
func _process(_delta):
    if Input.is_action_pressed("mouse_left") and is_hovered():
        delay -= 1
        if delay < 0:
            rect_position = get_global_mouse_position() - rect_size / 2 # Center mouse
            update_lines()
    if Input.is_action_just_released("mouse_left"):
        delay = 10
Last but not least we’ll add a little bit of flair to our tech tree. When the player clicks and holds the left mouse button over one the node we want the player to be able to drag and move the node. When this happens the node is repositioned below the player’s mouse. The lines connecting the nodes are also redrawn. To make this action not feel too abrupt we add a slight delay and only reposition the node if the player has held the mouse button down long enough. When the release the mouse button we reset the delay. It’s worth mentioning that we are polling the Input singleton in the _process callback rather than using the _input callback because using the Input singleton is recommended when we need to track if a user is holding a button down (refer to the docs). You may need to tweak the delay to suite your tastes.
Creating the tech tree
Creating the tech tree node is rather involved, but creating a tree using the tech tree node scene is simple. Ultimately we will display the tech tree in a viewport, so we will build the tech tree around the top left anchor (x = 0, y = 0).
Building the scene:
- Create a new scene from
Controlnode. - Save the scene and name it
Tree - Instance seven tech tree node scenes and name them A through G.
- Stack the nodes in tree like shape around the top left anchor.
- Attach a script to the root node and call
Tree.gd.
The tech tree scene.
Refer to figure 1 to get a sense for how the nodes should be laid out. It doesn’t have to be perfect so just try to get the layout close enough.
Tree.gd:
extends Control

var reset = []
In situations where the player can rearrange things I think it is polite to offer them a way to reset things back to the way they were before. reset keeps track of the original position of each node so we can put everything back.
func reset_nodes():
    var idx = 0
    for child in get_children():
        if child is Button:
            child.rect_position = reset[idx]
            child.update_lines()
            idx += 1
            child.pressed = false
            if child != $A: # A is the root of the tree and we want it enabled
                child.disabled = true
To actually reset each node we’ll iterate through each child of the tree scene that is a button to restore it to its original position by looking it up in the reset array. We’ll also reset the state of the buttons.
func _ready():
    $A.neighbors = [$B, $C]
    $B.neighbors = [$D, $E]
    $C.neighbors = [$F, $G]
    for child in get_children():
        if child is Button:
            reset.push_back(child.rect_position)
In the _ready callback we set up the neighbors for each node and store it’s original position so we can reset it later. If you run this scene now you should see some lines drawn between nodes, but you won’t be able to see each node because we added them around the top left anchor. We will take care of that next.
Bringing it all together
Now that we have all the ingredients of a tech tree, lets tie everything together with a nice interface. This scene is the most involved to build. Remember it isn’t strictly required that you build everything this way, but I consider this to be a good starting point that will allow your UI to be flexible enough for multiple orientations and resolutions.
Building the scene:
- Create a new scene with a
MarginContaineras the root node. - Save the scene and name it
Main.tscn. - Add a
ViewportContaineras child of the root node. - Add a
Controlnode as a child of theViewportContainer. - Set the
Controlnode’s left anchor to 1 and right anchor to 1. This anchors it at the top right of the screen. - Add a
Butotnas a child of theControlnode. This button will be our “reset” button, so go ahead and set the button text to “reset” as well. - Adjust the
rect_postionof the button so that it is inside the top right of the screen. I am using (x = -58, y = 10). - Add an
HSlidernode as a child of the viewport. TheHSliderwill be used to allow the player to zoom out on the tech tree. - Set the min value of the slider to 1 and the max and tick count to 5. Also set the step to 0.25. You can play with these values to suite your tastes.
- Add a
Viewportas a child ofViewportContainer. - Instance
Tree.tscnas a child of theViewport. - Add a
Camera2Das a child of theViewport. - Set the
currentproperty ofCamera2Dtotrue. Double check this if you don’t see anything when you run the scene. - Attach a script to the root node and call it
Main.gd - Connect the button pressed signal to the script.
- Connect the
HSlidervalue changed signal to the script. - Connect the
ViewportConatainerresized signal to the script.
Main.gd.
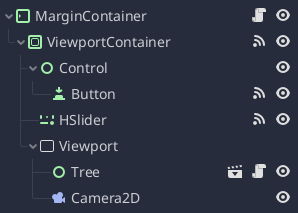
The main scene.
The code for the main scene is actually very simple. We don’t need to do anything complicated, just string things together.
func _ready():
    $ViewportContainer/Viewport.size = $ViewportContainer.rect_size
When this scene starts we want to make the viewport the same size as its container.
func _on_ViewportContainer_resized():
    $ViewportContainer/Viewport.size = $ViewportContainer.rect_size
Likewise, when the container is resized we also want to resize the viewport.
func _on_HSlider_value_changed(value):
    $ViewportContainer/Viewport/Camera2D.zoom.x = value
    $ViewportContainer/Viewport/Camera2D.zoom.y = value
When the player adjusts the slider we change the zoom of the camera to match the slider. This allows the player to zoom in and out.
func _on_Button_pressed():
    $ViewportContainer/Viewport/Tree.reset_nodes()
Finally, when the reset button is pressed we call the Tree’s reset_nodes function.
Conclusion
Hopefully this distillation of the common tech tree format gives you a starting place for creating your own tech tree. Of course, there is much more to creating a tech tree than the tree itself. You need to customize your version for your game. You can view the complete source code for this project on GitHub. Also, dialogue is another thing that is frequently represented as a tree in games. Be sure to check out my article on creating a dialogue system in Godot for another example of how trees and graphs are used in games.