The HC-SR04 ultrasonic distance sensor can measure can be used to measure distances at close range. There are plenty of blog articles out there that focus on how to use this sensor with an Arduino using the Arduino libraries to control the sensor. This article focuses on how to use the HC-SR04 using FlashForth, a Forth implementation for the Arduino, on the Arduino Uno board. Make sure you check the follow to this article where I improve the accuracy and resolution of the implementation discussed here.
WTF – What the Forth?
Forth is a real time programming language and operating system that runs on the Forth virtual machine. It is portable, small, and powerful. Like Lisp, Forth offers a REPL for interactive programming. If that appeals to you, read on. This article is aimed at readers familiar with FlashForth who are interested in seeing practical applications of FlashForth. However, I hope this article also piques the curiosity of newcomers.
Disclaimer
FlashForth is licensed under GPLv3. Therefore, all code in this article is licensed under GPLv3 as well. Additionally, this article contains links to affiliate sites. If you buy something by following one of these links, I make money, a very small amount of money. So little it hardly seems worth mentioning if it were not required by law for me to mention it. If you like the content on this site consider supporting it by following the affiliate links.
Bill of Materials
- Arduino Uno
- HC-SR04 Ultransonic Distance Sensor
- Jumper Wires


Optional Items
- USBTiny Programmer (to load the FlashForth bootloader)
- LEDs

Let’s do something useful…
We are programming our Arduino to use the HC-SR04 with FlashForth. As far as I know I am the first person to cover the subject. As a technical innovator I am the first at a lot of really cutting edge stuff.
Set a marker
FlashForth does not allow you to delete “words” (Forth for functions or procedures). In forth, words are stored to the “dictionary”. There are technical reasons for this, but those reasons are not important now. Setting a marker allows you to revert the dictionary to a previous state.
-hc-sr04

marker -hc-sr04
-hc-sr04 clears any previous marker with this name. If you go through the trouble of adding this code to your Arduino and then type -hc-sr04 and press enter all of your work will be gone. Neat!
Define ports and registers
Ports just mean hardware ports, but you might know them best as “pins” in your Arduino. To define a register or port you need to know the address. You can provide the address as a binary, decimal, or hex value. I am using hex values.
$0008 constant trig \ pin 11
$0010 constant echo \ pin 12
$0023 constant pinb
$0024 constant ddrb
$0025 constant portb
Pins 11 and 12 on the Arduino will serve as the trigger and echo pins for the HC-SR04. The trigger pin tells the HC-SR04 to emit a pulse and the echo pin stays “on” for as long as it receives the echo of the pulse. pinb is where we will look to see if echo is “on”. ddrb the register we will use to tell the Arduino what pins are set to write and what are set to read. portb is where we will write to when we want to trigger the HC-SR04.
Define some constants
The constants that follow are useful to the rest of our program.
343 constant sound-speed \ speed of sound 0.0343 meters/ms
3960 constant max-range \ max range of sensor
sound-speed 10 / 2/ constant min-range \ min range of sensor
Maybe you noticed the constant for the speed of sound is represented as an integer instead of a floating point value like 0.0343 meters per second and though that was odd. There is no floating point arithmetic available for FlashForth on the Arduino. To work around this, the values are scaled up. Beyond that, these values tell us the minimum and maximum range of the HC-SR04. The maximum range is just under 4 meters. The minimum range is actually 1 centimeter. However, FlashForth only offers millisecond timing resolution. We need microsecond resolution to measure closer than the minimum value we have defined currently. Additionally, lack of microsecond resolution will affect the accuracy of all measurements beyond the minimum distance. Most measurements will be “close”, but not exact.
To understand this limitation, consider that sound will travel about 34.3 centimeters in one millisecond. We are measuring how long sounds takes to travel to the object we are measuring and back. The closest we can measure is 17.15 centimeters. Consequentially, 17.15cm is the finest resolution for all measurements we can make with a millisecond timer. Although this is not precise, it is probably good enough for determining if something like a robot is about to run into a wall, but not good enough for telling a robot to hug the wall as it moves.
It is possible to implement microsecond resolution in FlashForth. One option might be to count clock cycles, which is what the pulseIn() in the Arduino standard library does. If you have an implementation please contact me.
Initialize trigger and echo
We need to initialize the trigger and echo pins to use the HC-SR04. The word below will initialize trigger and echo when it is called.
: init-hc-sr04 ( -- )
  trig ddrb mset \ set pin as output
  echo ddrb mclr \ set pin as input
;
Write to trigger and read from echo
The words that follow are primitives for reading and writing from the trigger and echo ports.
: trigger! ( -- ) portb c@ trig xor portb c! ;
The word trigger! toggles the bit that writes to the port we have assigned the trigger pin. Calling trigger! once will write to the trigger pin and cause the HC-SR04 to emit a pulse. The pulse is well outside of the range of human hearing and you will not be able to hear it. While writing this code I found it helpful to wire an LED to this pin in addition to the trigger pin on the HC-SR04 to confirm the trigger was activated.
: echo? ( -- f ) pinb c@ echo and 0= if false else true then ;
The word echo? reads from the port assigned to the echo pin. It tells us if the value is high or low and leaves a flag on the stack. The echo pin will go to high when the echo pin receives the pulse emitted by the trigger pin and remain high for as long as it receives the pulse.
Emitting the pulse
We need to emit a pulse for ten microseconds to generate an eight cycle pulse. The word us is a microsecond timer. This is offered as an add on in FlashForth so you will need to ensure this word is added to your Arduino before using the word us.
: pulse! ( -- ) trigger! #10 us trigger! ;
pulse! toggles the trigger pin to on, waits for ten microseconds, and toggles the trigger to off.
Timing the pulse
In order calculate the distance between an object and the HC-SR04 we need to time the pulse.
: pulse-ms ( -- u )
  begin echo? dup if ticks >r then until
  begin echo? 0= until
  ticks r> -
;
The word pulse-ms waits for the echo pin to go to high. When the echo pin goes to high pulse-ms places the current value of the word ticks on the return stack. ticks is a timer with millisecond resolution. After echo goes to high pulse-ms waits for echo to go back to low. When it does, it places the current value of ticks on the stack and pulls the previous value off of the return stack and subtracts them, leaving the elapsed time in milliseconds on the stack. pulse-ms is similar to pulseIn for the Arduino. However, pulseIn has microsecond resolution rather than millisecond resolution.
Measuring the distance
: dist? ( -- u ) pulse! pulse-ms sound-speed 2 */ ;
dist? queries the distance by combining all of the previous words into something useful. dist? works by generating a pulse, timing how long it takes that pulse to reach the echo pin, multiplying the time by the speed of sound constant sound-speed and dividing the result by two. We divide by two because sound must travel to the object and then back to the HC-SR04.
Format the output
As of now, we have all of the words we need to use the HC-SR04 so long we don’t mind translating the scaled value to a decimal value in our head. It would be nice if we can take a whole number like 1715, which we know means 171.5 centimeters, and display it as 171.5. The word below formats the output using a technique known as pictured numeric output to represent the decimal value as a string.
: fmt-dist ( u -- caddr u ) 0 <# # [char] . hold #s rot sign #> ;
Bring everything together
Now that we have the individual primitive and abstract words we need to interact with the HC-SR04 we can finally tie everything together. Because we know our sensor has some limitations we should use the min-range and max-range constants that we defined before to notify the user if the sensor is measuring an object that is too close or too far to measure accurately.
: show-dist ( u -- )
  dist?
  dup max-range > if ." too far " drop exit then
  dup min-range < if ." too close " drop exit then
  fmt-dist type ."  cm"
;
show-dist queries the distance, checks to see if the distance is too high or too low, printing an error if so. Otherwise show-dist formats the value of the distance query and adds the string " cm" so the user will see something like 171.5 cm.
Last but not least, we need to call init-hc-sr04 before we can use the sensor.
FlashForth includes some utilities for connecting to an Arduino running FlashForth. These utilities are written in Python and TCL. Personally, I struggled to use these tools and just use GNU Screen instead. After connecting your device it will show up in /dev as a tty device. Try running ls /dev/tty*.
screen `ls /dev/tty.usbmodem*` 38400
My Arduino has a name like tty.usbmodem123. The numbers at the end change depending on what port I use on my USB-C dongle (dongle lyfe). This script absolves me of needing to know the numbers. It will not work if there is more than one Arduino connected this way. The number 38400 is the baud rate for the connection. Once connected, we can paste the code for the HC-SR04 into the terminal. I recommend using iTerm because you can control how fast text is pasted in the terminal. I’ve found that it needs to be fairly slow. Around 50 to 100 bytes per second. This solution isn’t optimal, but it works.
With our code loaded on the Arduino we can test it out by calling show-dist. In the photo below I am measuring the distance between the sensor and a portrait of Aaron Paul painted with neon paints that I found at a Goodwill in Ventura, California.
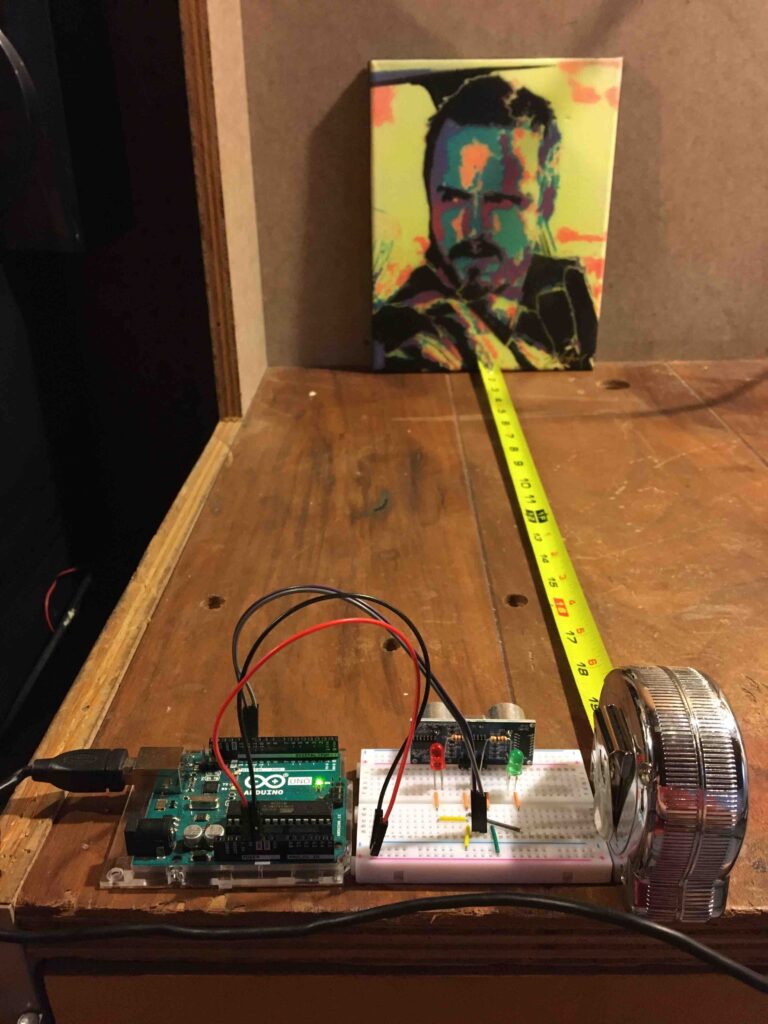
show-dist 51.4 cm ok<#,ram>
If the command hangs type ctrl-O and try calling the init function first. This can happen if you have powered cycled your Arduino since loading the code.
Take a look at this gist to see the complete listing of the code discussed in this article.
Conclusion
Hopefully this article gives you an idea of how to do useful things with FlashForth on the Arduino. There are some improvements that will make the measurements more accurate. First, as I mentioned before, implementing some form of microsecond resolution timer will improve the accuracy of the measurements. Another potential improvement is to use a thermometer and a humidity sensor like the DHT11 to generate a more accurate speed of sound constant. In my next article about the HC-SR04 I improve upon this implementation.